
Oops! Sent the Wrong Email? Here’s How to Recall an Email
Sending the wrong email can be a frustrating and embarrassing mistake. Fortunately, many email platforms offer the option to recall emails, allowing you to correct your errors before they are seen by the recipient. In this article, we will explore the process of recalling emails in Outlook and Gmail, as well as best practices for email recall. We will also discuss alternative methods for addressing email mistakes. Here are the key takeaways from this article:
Key Takeaways
- Email recall allows you to retrieve a mistakenly sent email or make necessary changes.
- Outlook and Gmail provide options to recall emails within a certain timeframe.
- Recalling an email may not always be successful due to limitations and email protocols.
- Double-checking before sending, acting quickly, notifying recipients, and following up personally are best practices for email recall.
- Apologizing and clarifying, sending a follow-up email, and using encryption and confidentiality measures are alternatives to email recall.
Understanding Email Recall

What is Email Recall?
Email recall is a feature that allows users to retract or undo a sent email. It provides the ability to retrieve a message that was sent mistakenly or requires some changes. Unfortunately, Yahoo Mail does not have a built-in email recall feature. However, there are alternative inboxes that offer this functionality. It’s important to note that email recall is not foolproof and may not always be successful in retrieving a sent email.
Why is Email Recall Important?
Email recall is an important feature that allows users to retract a sent email and prevent unintended consequences. It provides a safety net for those moments when you realize you made a mistake or sent sensitive information to the wrong recipient. By recalling an email, you can avoid potential embarrassment, protect your privacy, and maintain professionalism in your communication.
Limitations of Email Recall
While email recall can be a useful feature, it is important to understand its limitations. One of the main limitations is that email recall only works within the same email ecosystem. Once an email leaves the ecosystem of platforms like Outlook or Gmail, it cannot be recalled. This means that if the recipient is using a different email service, the recall request will not be effective. Additionally, even within the same ecosystem, the success of email recall is not guaranteed. It depends on various factors such as the recipient’s email settings and whether they have already read the email. Therefore, it is crucial to double-check the accuracy of your emails before sending them to avoid the need for email recall.
How to Recall an Email in Outlook

Step 1: Open Outlook
To recall an email in Outlook, follow these steps:
- Open Outlook on your computer.
- Go to the ‘Sent Items’ folder in the folder pane on the left side of the window.
- Double-click the email you want to recall.
- Look for the ‘Actions’ tab at the top of the window and click on it.
- Select ‘Recall This Message’ from the drop-down menu.
- Choose the recall options that best suit your needs.
- Confirm the email recall.
Remember to act quickly when recalling an email to increase the chances of success. It’s also a good practice to notify the recipients and follow up personally to ensure the message is properly addressed.
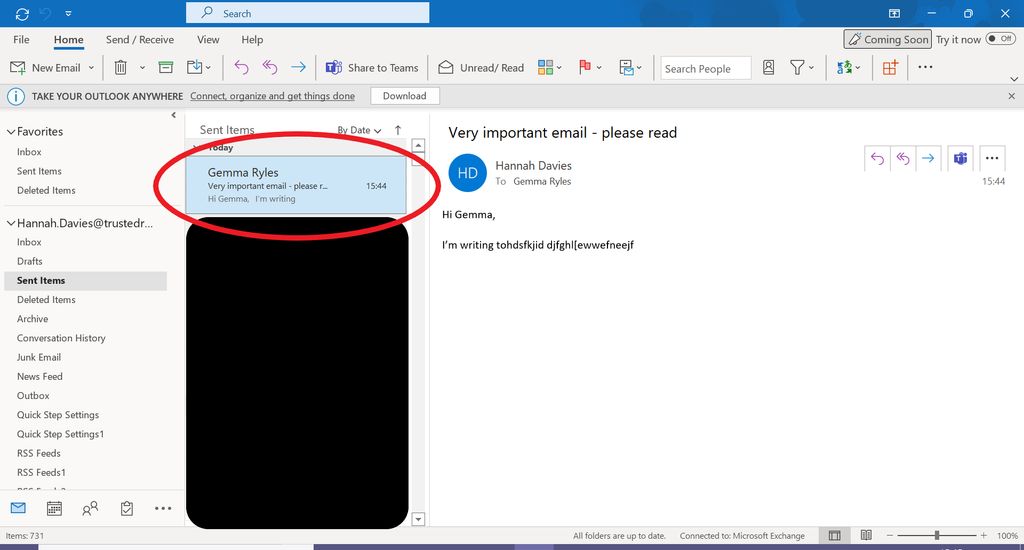
Step 2: Go to the Sent Items Folder
After opening Outlook and logging in, navigate to the ‘Sent Items’ folder. This folder contains all the emails you have sent. You can find it in the folder pane on the left side of the window. Click on the ‘Sent Items’ folder to open it and view the list of sent emails. Once you are in the ‘Sent Items’ folder, you can proceed to the next step to recall the email.
Step 3: Open the Email to be Recalled
To recall an email in Outlook, follow these steps:
- Open Outlook and go to the Sent Items folder.
- Locate and open the email you want to recall.
- Click on the ‘Actions’ tab.
- Select ‘Recall This Message’ from the dropdown menu.
- Choose the recall options that best suit your needs.
- Confirm the email recall.
Please note that the success of email recall depends on various factors, such as the recipient’s email client and settings. It’s important to act quickly and follow up personally to ensure the message is properly addressed.
Step 4: Click on the ‘Actions’ Tab
After opening the email to be recalled, click on the ‘Actions’ tab located at the top of the Outlook window. This tab contains various options for managing your email, including the option to recall a message. By clicking on the ‘Actions’ tab, you will be able to access the necessary features to initiate the email recall process.
To recall an email in Outlook, follow these steps:
- Open Outlook
- Go to the Sent Items folder
- Open the email to be recalled
- Click on the ‘Actions’ tab
- Select ‘Recall This Message’
- Choose recall options
- Confirm email recall
Remember to act quickly and double-check before sending important emails to avoid the need for email recall.
Step 5: Select ‘Recall This Message’
After selecting ‘Recall This Message’, you will be presented with recall options. Choose either ‘Delete unread copies of this message’ or ‘Delete unread copies and replace with a new message’ based on your preference. Once you have made your selection, click on ‘recall’ to confirm the recall. Please note that if you choose to ‘Delete unread copies and replace with a new message’, the original message will be opened for editing. It is important to act quickly and notify the recipients about the recall to minimize any potential confusion or misunderstandings.
Step 6: Choose Recall Options
After selecting the email to be recalled, you will be presented with recall options. These options allow you to choose how you want to recall the email and what actions should be taken. It is important to carefully consider these options to ensure the desired outcome. Recall email outlook is a common keyword used when referring to this step. Here are some important points to keep in mind:
- If you choose to ‘Delete unread copies of this message’, the email will be deleted from the recipient’s inbox without them seeing it.
- If you choose to ‘Delete unread copies and replace with a new message’, the original email will be replaced with a new message that you can edit.
It is recommended to think through your options and select the one that best suits your needs. Take your time and make sure you are confident in your decision before confirming the recall.
Step 7: Confirm Email Recall
After selecting the ‘Recall This Message’ option, you will be prompted to confirm the email recall. Take a moment to review the recall options you have chosen and ensure they align with your intentions. Double-check that you have selected the correct recall option, whether it is to delete unread copies of the message or replace them with a new message. Once you are satisfied with your choices, click on the ‘Confirm’ button to initiate the email recall process.
Remember, once the recall process is initiated, it may take a few moments for the action to complete. Be patient and allow the system to process the recall request. It is also important to note that the success of the recall depends on various factors, such as the recipient’s email client and whether they have already read the email.
To summarize:
- Review the recall options you have chosen
- Confirm that you have selected the correct recall option
- Click on the ‘Confirm’ button to initiate the recall
Tip: It is recommended to act quickly when recalling an email to increase the chances of success. Notify the recipients about the recall and follow up personally if necessary.
Recalling an Email in Gmail

Step 1: Open Gmail
To recall an email in Gmail, follow these steps:
- Open Gmail.
- Go to the ‘Sent’ folder.
- Open the email to be recalled.
- Click on the ‘More’ button.
- Select ‘Recall This Message’.
- Choose recall options.
- Confirm email recall.
Remember to act quickly when you realize you’ve sent the wrong email. The longer you wait, the higher the chances that the recipient has already seen it. Additionally, it’s a good practice to notify the recipients about the recall and follow up with them personally to ensure they are aware of the mistake. If email recall is not possible or if you want to provide further clarification, you can also send a follow-up email or use encryption and confidentiality measures to protect sensitive information.
Step 2: Go to the ‘Sent’ Folder
After opening Gmail, navigate to the ‘Sent’ folder. This folder contains all the emails you have sent. You can find it in the left sidebar of the Gmail interface. Click on the ‘Sent’ folder to open it and access your sent emails.
Once you are in the ‘Sent’ folder, you will see a list of your sent emails. Scroll through the list or use the search bar to locate the specific email you want to recall.
Note: If you have a large number of sent emails, you can use the search bar and enter keywords or the recipient’s email address to narrow down the search.
If you are using the Gmail mobile app, you can access the ‘Sent’ folder by tapping on the menu icon (three horizontal lines) and selecting ‘Sent’.
Step 3: Open the Email to be Recalled
Once you have accessed the ‘Sent’ folder in Outlook or Gmail, locate the email that you want to recall and open it. Take a moment to review the contents of the email and ensure that it is the correct one. Pay attention to any important keywords or phrases that may need to be emphasized. If necessary, you can use bold formatting to highlight these keywords and italics for subtle emphasis.
If you are dealing with structured, quantitative data related to the email, consider presenting it in a Markdown table. This will help to organize the information in a clear and concise manner.
Alternatively, if the content is less structured, such as a series of steps or qualitative points, you can use a bulleted or numbered list. This will make it easier for readers to follow along and understand the instructions.
Remember to double-check the email before proceeding with the recall process. It is important to act quickly and notify the recipients if necessary. If you have any additional tips or advice related to email recall, you can include them in a Markdown blockquote.
Please note that the process of recalling an email may vary depending on the email client and device you are using. For example, on mobile devices, you may need to follow a slightly different set of steps. Refer to the specific instructions provided by your email client for more information.
Step 4: Click on the ‘More’ Button
After opening the email to be recalled, the next step is to click on the ‘More’ button. This button is usually located in the toolbar or menu options of the email client. By clicking on the ‘More’ button, additional options and actions for the email will be displayed. Look for the option to ‘Recall This Message‘ among the available actions. Clicking on this option will initiate the email recall process.
Step 5: Select ‘Recall This Message’
After selecting ‘Recall This Message’, you will be presented with recall options. These options include:
- Delete unread copies of this message: This option will delete the email from the recipient’s inbox without them having read it.
- Delete unread copies and replace with a new message: This option will delete the original email and replace it with a new one that you can edit.
It’s important to note that if you choose to replace the email, the original message will be opened for editing. Consider the following best practices when recalling an email:
- Double-check before sending to minimize the need for recalls.
- Act quickly to recall the email as soon as you realize the mistake.
- Notify recipients if necessary to explain the recall.
- Follow up personally to ensure the message is understood and addressed.
Remember, email recall is not foolproof and may not always be successful. It’s always a good idea to double-check and proofread your emails before sending them.
Step 6: Choose Recall Options
After selecting the ‘Recall This Message’ option, you will be prompted to choose recall options. Here are some important points to consider:
- If you choose ‘Delete unread copies of this message’, the email will be deleted from the recipient’s inbox without them seeing it.
- If you choose ‘Delete unread copies and replace with a new message’, the original email will be replaced with a new one that you can edit.
It’s important to carefully consider which option is most appropriate for your situation. Remember, once you confirm the recall, the process will be done.
Step 7: Confirm Email Recall
After selecting the ‘Recall This Message’ option, you will be prompted to confirm the email recall. Take a moment to review the recall options you have chosen and ensure they align with your intentions. Double-check the recipients and any additional actions you have selected. Once you are satisfied, click on the ‘Confirm’ button to initiate the email recall process.
Here is a table summarizing the recall options available in Outlook:
| Recall Option | Description |
|---|---|
| Delete unread copies of this message | Removes the email from the recipients’ inboxes, but they may still have read the message if they accessed it before the recall. |
| Delete unread copies and replace with a new message | Deletes the original email and replaces it with a new one. The new message can include any necessary corrections or updates. |
Remember, it is important to act quickly and notify the recipients about the recall to minimize any potential confusion or misunderstanding. Additionally, consider following up personally with the recipients to address any concerns or provide further clarification if needed.
Best Practices for Email Recall

Double-Check Before Sending
Before sending an email, it is crucial to double-check the content to avoid any mistakes or oversights. This simple step can save you from potential embarrassment or misunderstandings. Here are some best practices to follow:
- Review Attachments: Make sure to review the files before writing the message to ensure that you have included all the necessary attachments. This will help you avoid the common mistake of forgetting to attach important files.
- Add Recipient’s Email Address at the End: To prevent accidentally sending an incomplete email, it is recommended to add the recipient’s email address after proofreading and making other checks. This way, even if you click the ‘Send’ button prematurely, the email won’t leave your mailbox.
- Turn on Spelling and Grammar Checks: Enabling the spelling and grammar-checking features in your email client can help maintain professionalism and avoid miscommunication, especially in cross-cultural communications.
Remember, taking a moment to double-check your email before sending it can save you from potential errors and ensure effective communication.
Act Quickly
When you realize that you’ve sent the wrong email, it’s important to act quickly to minimize any potential damage. The longer you wait, the higher the chances that the recipient has already read the email or taken action based on its contents. Here are some steps you can take to address the situation:
- Pause and assess: Take a moment to gather your thoughts and evaluate the impact of the email. Determine whether it’s necessary to recall the email or if a follow-up email would suffice.
- Contact the recipient: If the email contains sensitive or confidential information, it’s advisable to reach out to the recipient directly and explain the situation. Apologize for the mistake and offer any necessary clarifications.
- Follow up promptly: Whether you recall the email or send a follow-up, make sure to do so promptly. This shows your professionalism and commitment to resolving the issue.
Remember, time is of the essence when it comes to email recall. Acting quickly can help mitigate any potential negative consequences and maintain a positive professional relationship with the recipient.
Notify Recipients
When recalling an email, it is important to notify the recipients about the recall. Communication is key in these situations to avoid confusion and ensure that everyone is aware of the recall. Here are some best practices for notifying recipients:
- Send a follow-up email: After recalling the email, send a follow-up email explaining the reason for the recall and any necessary information.
- Act quickly: Notify the recipients as soon as possible to minimize any potential damage or misunderstandings.
- Be clear and concise: Clearly explain the reason for the recall and provide any necessary instructions or next steps.
Remember, it is important to handle the situation professionally and promptly to maintain good communication and relationships with the recipients.
Follow Up Personally
When you realize that you have made a mistake in an email and need to correct it, it is important to follow up personally with the recipients. This shows that you take responsibility for the error and value the relationship with your recipients. Unsend email as soon as possible to minimize any potential negative impact. Here are some tips for a successful follow-up:
- Act quickly: Time is of the essence when it comes to correcting a mistake. The sooner you send the follow-up email, the better.
- Notify recipients: Let the recipients know about the mistake and apologize for any inconvenience caused.
- Keep it concise: Keep the follow-up email short and to the point. Avoid going into unnecessary details.
- Be sincere: Show genuine remorse for the mistake and assure the recipients that steps have been taken to rectify it.
- Offer assistance: If applicable, offer any necessary assistance or provide additional information to resolve any issues caused by the mistake.
Remember, a personal follow-up can go a long way in maintaining trust and credibility with your recipients.
Alternatives to Email Recall

Apologize and Clarify
When you realize that you have sent an email to the wrong recipient, it is important to apologize and clarify the situation. Acknowledge the mistake without passing blame and take responsibility for the error. Avoid making jokes or blaming others, as it can undermine the seriousness of the situation. Keep the apology email loose and use your brand voice to maintain authenticity. Aim to turn your mistake into an opportunity by offering a solution or alternative. By addressing the issue promptly and sincerely, you can maintain trust and credibility with your recipients.
Send a Follow-Up Email
After realizing your mistake in an email campaign, it is important to send a follow-up email to correct the error and provide clarification. Here are the steps to follow:
- Build a list of everyone who received the initial campaign.
- Write a concise and contrite apology, acknowledging the mistake.
- Consider if there is an opportunity to capitalize on the mistake and provide additional value.
- Send your apology/correction as a reply to the initial campaign.
Sending a follow-up email allows you to address the mistake directly and ensure that all recipients receive the corrected information. It also shows professionalism and accountability. Remember to be sincere and straightforward in your apology, and use this opportunity to strengthen your relationship with your audience.
Tip: Take advantage of email marketing tools like GMass to easily send a new campaign as a reply to the initial email, ensuring that it is part of the same thread.
For more tips and best practices on sending an email correction, refer to the table below:
| Step-by-Step Guide to Sending a Correction Email |
|---|
| Assess the damage caused by the mistake and plan your correction accordingly. |
| Craft a clear and concise email that addresses the mistake and provides the correct information. |
| Personalize the email if possible to show that you value the recipient’s relationship. |
| Send the correction email promptly to minimize any confusion or misinformation. |
| Follow up personally with important recipients to ensure they have received the correction. |
| Monitor the impact of the correction and make any necessary adjustments or apologies. |
By following these steps and best practices, you can effectively correct a mistake in an email campaign and maintain a positive relationship with your audience.
Use Encryption and Confidentiality Measures
When it comes to protecting sensitive information, encryption and confidentiality measures are essential. Encryption ensures that the content of your emails is secure and can only be accessed by authorized recipients. By encrypting your emails, you add an extra layer of protection against unauthorized access or interception. Additionally, implementing confidentiality measures such as password protection or two-factor authentication adds another level of security to your email communications.
To ensure the highest level of security, it is important to choose an email security provider that prioritizes data privacy and compliance with regulations. Make sure to inquire about their practices to protect individual privacy, such as the use of anonymization and pseudonymization techniques. You should also ask about where the data is stored and if it is processed and stored in a manner that complies with data privacy regulations like the GDPR or CCPA.
In summary, using encryption and confidentiality measures is crucial for safeguarding sensitive information in your emails. By choosing a reliable email security provider and implementing these measures, you can have peace of mind knowing that your data is protected.
In today’s digital age, email has become an essential communication tool. However, we’ve all experienced that sinking feeling when we realize we’ve sent an email with a mistake or to the wrong recipient. Fortunately, there are alternatives to email recall that can help rectify these situations. One option is to use a secure messaging platform that allows you to retract or delete messages even after they have been sent. Another alternative is to use encrypted email services that provide an extra layer of security and control over your messages. Additionally, some email clients offer a delay send feature, which allows you to set a time delay before your email is actually sent, giving you a chance to review and make any necessary changes. These alternatives to email recall can help prevent embarrassing or damaging situations. If you want to ensure your email communication is secure and error-free, consider exploring these options on our website, Squeeze page.
Conclusion
In conclusion, sending the wrong email can be a common mistake, but there are steps you can take to recall or correct it. While some email platforms like Gmail and Outlook offer an ‘undo send’ option, it has a limited time window. Unfortunately, Yahoo Mail does not have a recall option, but you can prevent mistakes by double-checking attachments and recipients before sending. If you do make an error, it’s best to assess whether a correction is necessary and send a follow-up email if needed. Remember, prevention is key, so take the time to review your emails before hitting send.
Frequently Asked Questions
Can I recall an email in Outlook?
Yes, you can recall an email in Outlook. Follow the steps mentioned in the article to recall an email in Outlook.
Can I recall an email in Gmail?
Yes, you can recall an email in Gmail. Refer to the article for detailed instructions on how to recall an email in Gmail.
What are the limitations of email recall?
Email recall has some limitations. Read the article to understand the limitations of email recall.
What are the best practices for email recall?
There are some best practices for email recall. The article provides detailed information on the best practices to follow.
What are the alternatives to email recall?
If email recall is not possible, there are alternatives you can consider. Refer to the article for information on alternative options.
How can I avoid incorrectly sending emails?
To avoid incorrectly sending emails, there are some suggestions you can follow. Read the article for tips on avoiding email mistakes.